

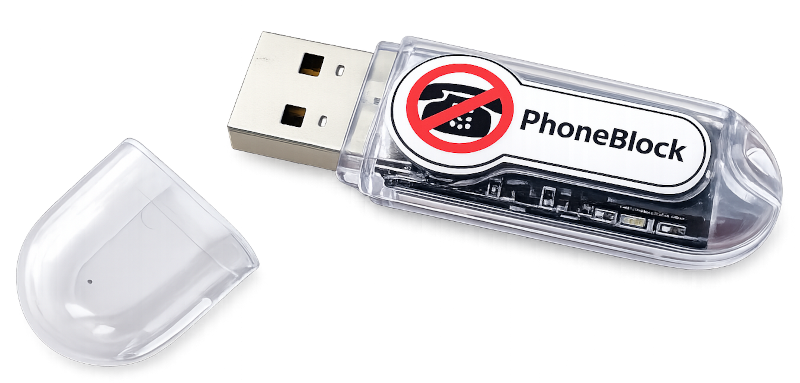
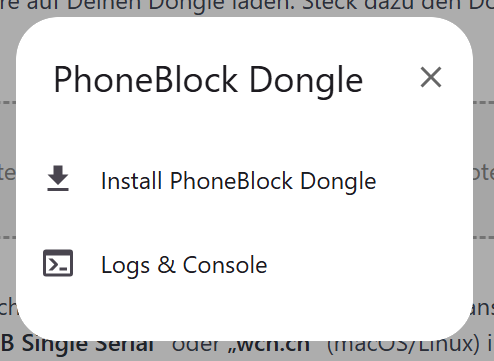
PhoneBlock dongle New
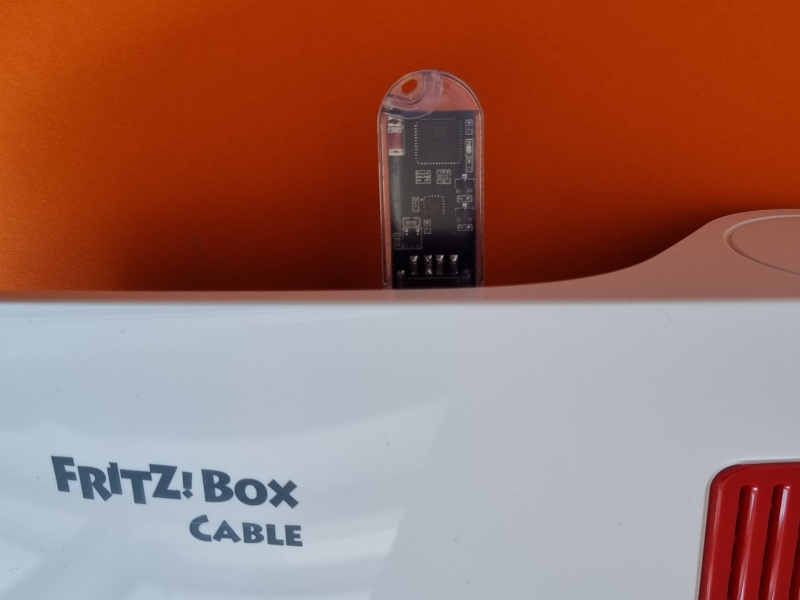
An intelligent answering machine in the guise of an IP phone. The size of a thumb, it plugs into the router's USB port, registers as an additional SIP phone - and intercepts commercial calls before your actual phone rings. Works regardless of the router model, even without a Fritz!
The idea in one sentence
The PhoneBlock dongle logs on to your router like an additional IP phone. Every time a call comes in, it asks the PhoneBlock database at lightning speed: "Is this spam?" If so, it answers the call itself, plays a short announcement if desired and hangs up again. Your real phone has not even rung at that moment. In contrast to the cloud answering machine, all call processing takes place locally at your home.
1st call comes in
The router signals the call to all registered telephones - including the PhoneBlock dongle. The "real" telephones can be configured with a ring delay of 3-5 seconds.
2. flash check
The PhoneBlock dongle asks PhoneBlock at lightning speed whether the number is known to be spam. The query runs via encrypted HTTPS and only transmits a hash of the number. Calls from contacts in your phone book are not even checked - they never leave your home network.
3. get rid of it
If the number is spam, the PhoneBlock dongle picks up, plays an announcement and hangs up. The telephone in the living room remains silent. If the number is not known spam, the PhoneBlock dongle simply does nothing - the call goes through normally.
Universally applicable
The dongle runs stable with all Fritz!Box routers regardless of the telephone provider (it should also work with really old Fritz!Box models - but of course without guarantee).
The dongle runs stable on all Deutsche Telekom connections regardless of which router you use.
The dongle also works without a Fritz!Box router, but at least one of the two points must be fulfilled:
- Your router allows you to register a VOIP phone (most modern routers can do this - but the "EasyBox" from Vodafone, for example, cannot). It is best to check the operating instructions for your router beforehand.
- Your telephone provider allows the direct registration of a VOIP telephone directly to its infrastructure - then your router model does not matter. (Deutsche Telekom allows this, Vodafone does not, for example. It is best to ask your provider).
The dongle does not work on Vodafone connections in combination with an EasyBox from Vodafone.
If you have successfully set up the dongle - especially in combination with a non-Fritz!Box router, or a "historical" Fritz!Box model then please write an experience report so that this help can improve.
This is where it gets practical: the instructions guide you step-by-step through ordering and setup - around €10 hardware, just a few minutes' work.
Step 1 - Order dongle
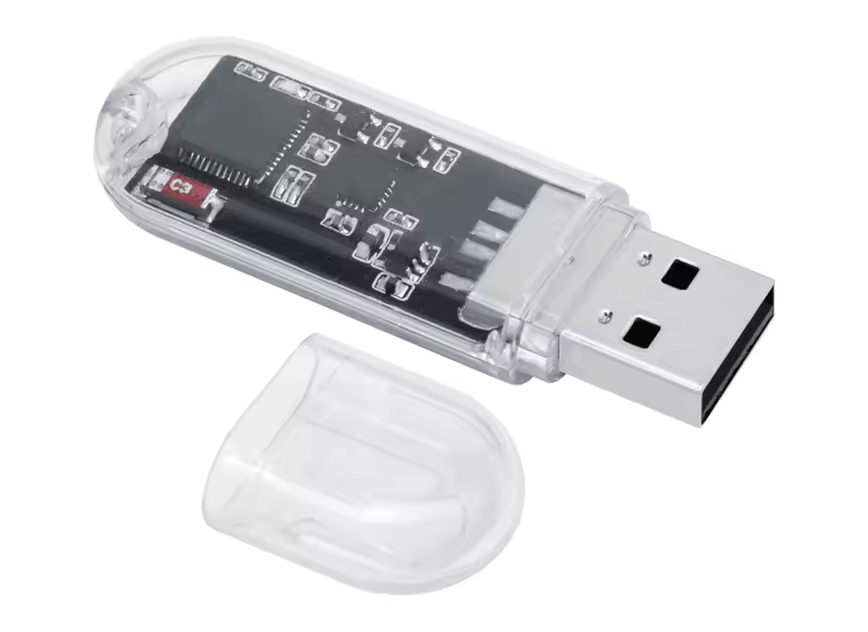
Order this USB dongle ("ESP32 developer board"). Don't worry, you don't have to "develop" anything, just install the finished PhoneBlock software from the browser.
Delivery from China - approx. 2 weeks delivery time. Price currently approx. 10 € including shipping.
These offers are in no way related to PhoneBlock and PhoneBlock is in no way involved in the profits. This is only about the hardware. You install the PhoneBlock software (firmware) yourself after receipt (see below).
You are tinkering yourself and already have an ESP32 in the drawer? PhoneBlock will almost certainly work on your board if it has at least 4MB of flash memory. You may need a different USB serial driver or have to reconfigure the PIN assignment so that the status LED flashes - it's best to take a look at the project page.
Step 2 - Prepare the dongle
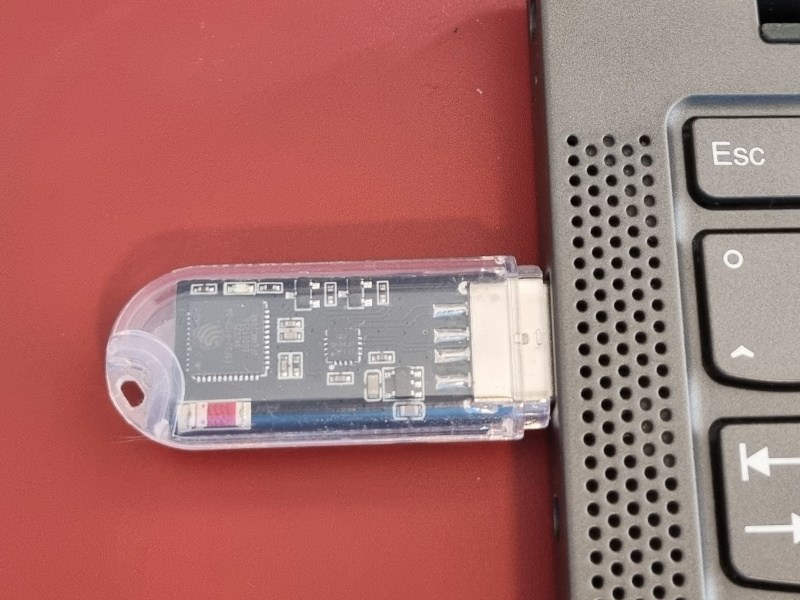
You need to load the PhoneBlock software onto your dongle once. To do this, plug the dongle once into a free USB port on your computer. Don't have a computer? Just ask a friend if they can prepare the dongle for you. You can also set it up later in your network from a cell phone. You won't need any other devices for operation.
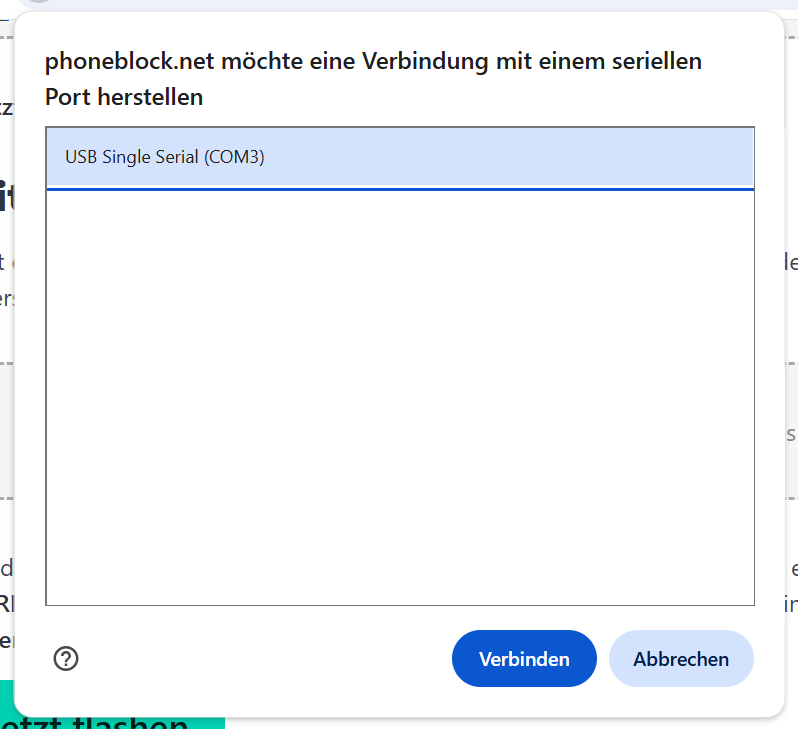
Click on the button. The browser then asks which connected device it may address. Select the entry with "USB-SERIAL CH340" (Windows) or "USB Single Serial" or "wch.cn" (macOS/Linux) in the name and confirm with "Connect".
A list of all serial devices on the computer appears in the selection dialog. If several CH340 devices are displayed because another device with this chip happens to be connected, remove the others for the moment.
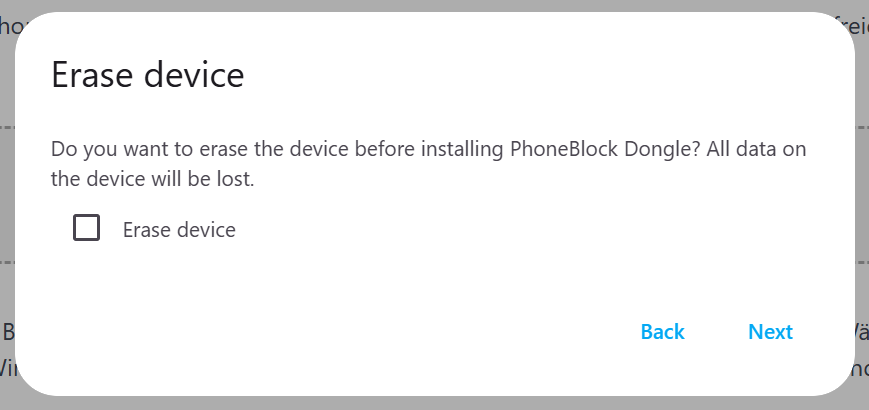
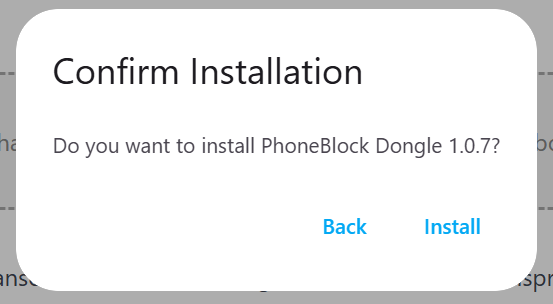
Confirm the security prompt "Install PhoneBlock dongle?" with "Install". The PhoneBlock software will now be loaded onto the dongle - this will take about a minute. Do not unplug the dongle during this time.
Computer does not recognize the dongle? Driver hints
The dongle uses the CH340 USB serial chip. Current Windows, macOS and Linux versions usually already include the driver - in this case, you don't need to do anything. However, if your computer does not display the dongle in the device selection, the following instructions will help:
- Windows: Download the CH340 driver from wch-ic.com, execute
CH341SER.EXEand click on "INSTALL". No restart necessary. - macOS: As of macOS Big Sur, the driver is included in the system - no installation step necessary.
- Linux: The kernel driver is installed. On Ubuntu, the BRLTTY service can snatch away the CH340 so that you cannot see the device file - then uninstalling BRLTTY will help:
sudo apt remove --purge brltty. Your user must also be in thedialoutgroup:sudo usermod -aG dialout $USER. Both steps are described in detail in GETTING_STARTED.md.
Step 3 - Plug the PhoneBlock dongle into the router
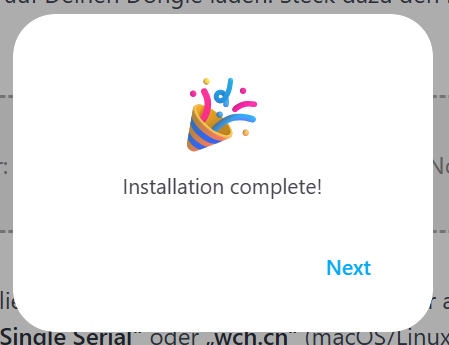
When the browser reports "Installation complete!", remove the PhoneBlock dongle from the computer and plug it into a free USB port on your router (or any 5 V USB power supply within WLAN range).
Step 4 - Add the PhoneBlock dongle to the WLAN (WPS)
The PhoneBlock dongle does not yet have any Wi-Fi access data and is waiting for you to connect it to your Wi-Fi. The LED flashes quickly (about five times per second) and signals "Pairing mode active".
Now press the WPS button on the router. On the Fritz!Box, this is the "Connect / WPS" button on the top of the device - press briefly until the Wi-Fi LED on the router itself starts to flash. Other routers label the button "WPS" or "Pair". Within a few seconds, the router transmits your Wi-Fi access data to the PhoneBlock dongle, which saves it and connects.
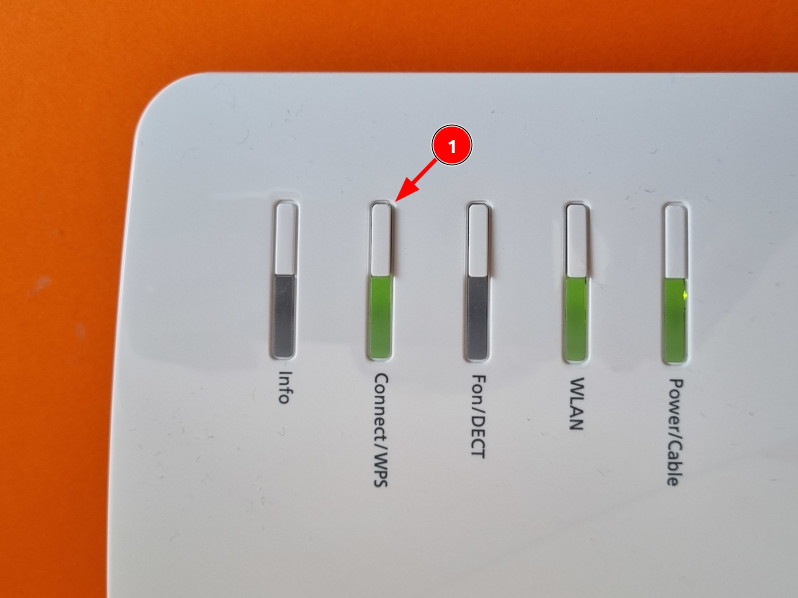
Well done: The LED now flashes slowly (about once per second) - the PhoneBlock dongle is in the WLAN, has received an address and is waiting for configuration (next step).
Did not work Check in the router settings whether WPS is activated (on the Fritz!Box: WLAN → Security → WPS). If the WPS window was too short, the PhoneBlock dongle automatically restarts the pairing - then simply press the WPS button again.
Your WLAN does not have WPS? Some access points (e.g. UniFi) do not have a WPS button. Then enter the WLAN access data directly in the Flash dialog: Leave the PhoneBlock dongle on the computer for this (or plug it back in), click on "Flash now" at the top of step 2 and connect to the dongle - instead of a new installation, the dialog now offers "Configure Wi-Fi". Select your network from the list and enter the Wi-Fi password; the dialog will ask for it immediately after the initial installation. Then plug the PhoneBlock dongle into the router as in step 3.
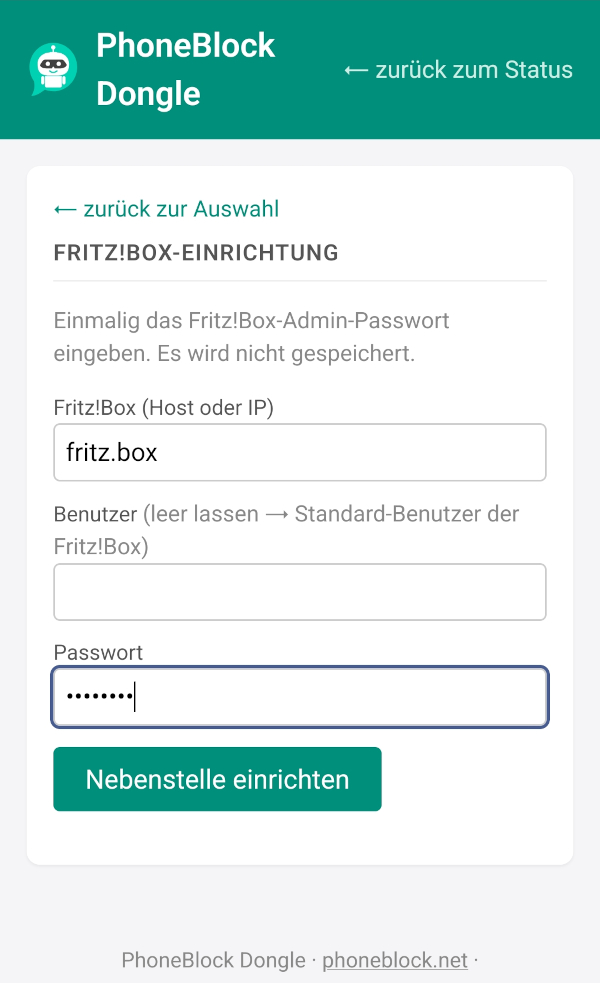
Step 5 - Register as a phone and set up PhoneBlock access
In order for the PhoneBlock dongle to intercept calls, it still needs two things: your SIP access data (so that it can log in as an additional phone) and a PhoneBlock token (so that it can query the spam database). You enter both in the web interface of the PhoneBlock dongle. You can also do the rest of the setup from a cell phone.
Open in the browser:
If this link does not work, look in the device list of your router for a device with the name answerbot, make a note of its IP address and call it up in the browser - e.g. http://192.168.178.xxx/.


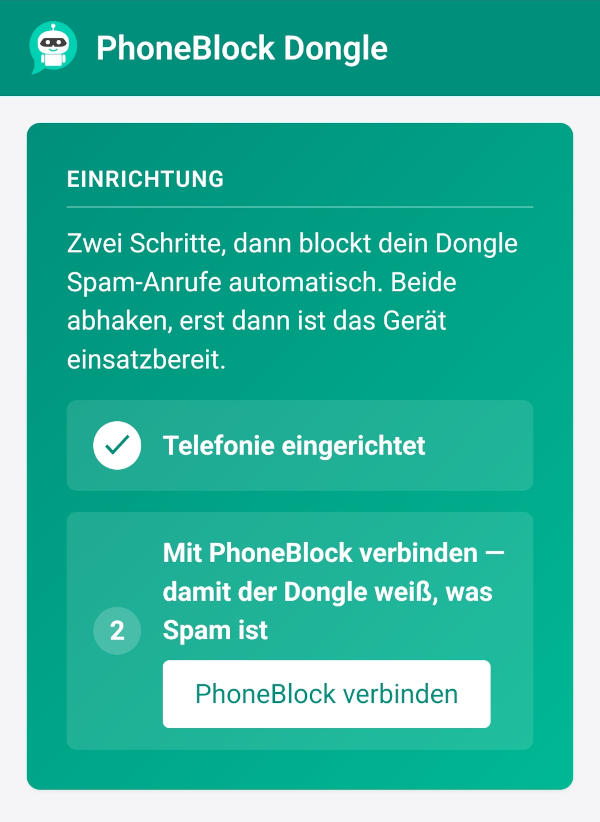
Enter in the web interface:
- SIP access data - user name, password and registrar address. For a Fritz!Box, create an additional connection under Telephony → Telephony devices → Set up new device → Telephone (with and without answering machine) → LAN/WLAN (IP telephone). Enter the access data assigned there here and enter
fritz.boxas the registrar. - PhoneBlock token - create an API token in your PhoneBlock settings and copy it into the corresponding field.
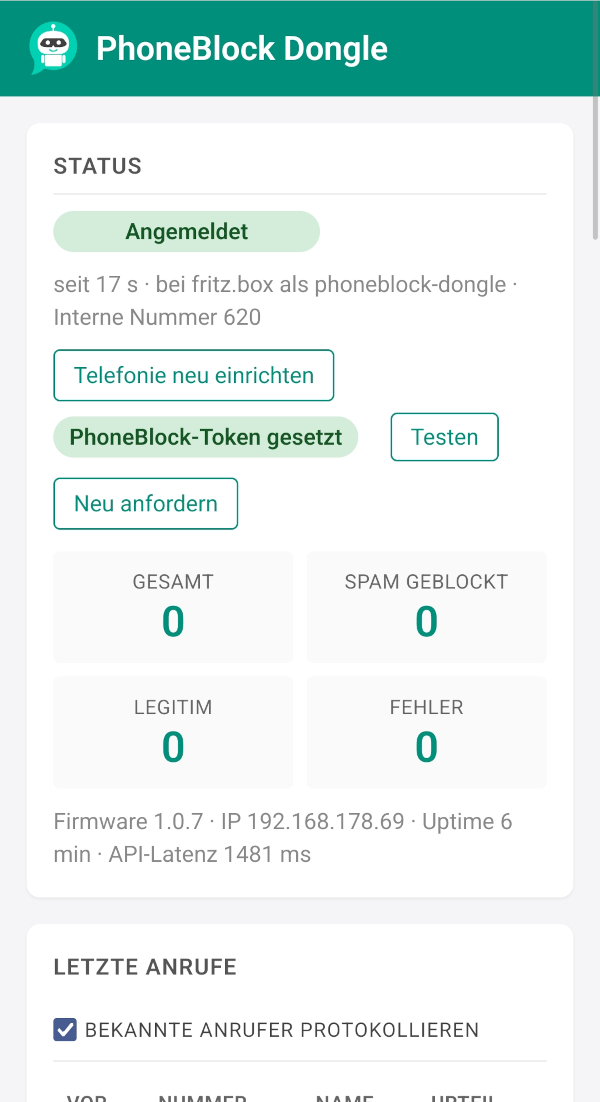
Save → the LED is now permanently lit → the PhoneBlock dongle is ready for use. Spam calls will now be silently intercepted before your phone rings.
Something is not working, you are using Firefox/Safari, Linux with peculiarities or another board? The detailed instructions with all options, Linux pitfalls and the ESP-IDF toolchain can be found in the repo: GETTING_STARTED.md.
Contribute experience report
The first PhoneBlock dongles work reliably - but router models, providers and connection types are a mixed bag, and every combination has its own peculiarities. In order to improve the setup wizard, structured experience reports are worth their weight in gold - regardless of whether everything worked for you or whether something went wrong.
Setups that are not yet well covered are particularly interesting:
- Telekom connection with Speedport router
- Vodafone/Unitymedia cable connection with the supplied provider box
- 1&1, o2, Deutsche Glasfaser and other providers
- International connections (Switzerland, Austria, the rest of Europe and the world)
Reports are run via GitHub issues - a pre-filled form asks for the most important key data (hardware, router, provider, firmware version, findings) in a structured manner. Other testers can see directly which setups are already covered and which are not.
Source code of the firmware: phoneblock-dongle on GitHub.